Identity Server 授权
1. RBAC
基于角色的授权方式(Role-based Access Control(RBAC))是一种常见的授权方式。Asp.Net中基于角色授权的使用在基于-策略-的角色授权章节中有所讲解。下面我们来简单演示如何在Identity Server中使用RBAC。
目前市场前后端分离的项目结构较为流行,故而下面我们以Implicit flow授权方式为例,使用纯JavaScript客户端访问被保护的API资源。本节示例代码采用Implicit flow章节案例只稍作扩展修改。
1.1 Identity Server
本节我们继续使用Authorization Code章节中的IdentityServer服务。本节代码已分享到Github。
因为要使用角色进行鉴权,我们需要在TestUsers.Users中为alice/bob两个模拟用户分别设置不同的角色。
public static List<TestUser> Users
{
    get
    {
        var address = new
        {
            street_address = "One Hacker Way",
            locality = "Heidelberg",
            postal_code = 69118,
            country = "Germany"
        };

        return new List<TestUser>
        {
            new TestUser
            {
                SubjectId = "818727",
                Username = "alice",
                Password = "alice",
                Claims =
                {
                    new Claim(JwtClaimTypes.Name, "Alice Smith"),
                    new Claim(JwtClaimTypes.GivenName, "Alice"),
                    new Claim(JwtClaimTypes.FamilyName, "Smith"),
                    new Claim(JwtClaimTypes.Email, "AliceSmith@email.com"),
                    new Claim(JwtClaimTypes.EmailVerified, "true", ClaimValueTypes.Boolean),
                    new Claim(JwtClaimTypes.WebSite, "http://alice.com"),
                    new Claim(JwtClaimTypes.Address, JsonSerializer.Serialize(address),
                        IdentityServerConstants.ClaimValueTypes.Json),
                    new Claim(JwtClaimTypes.Role, "Administrator"),
                    new Claim(JwtClaimTypes.Role, "User")
                }
            },
            new TestUser
            {
                SubjectId = "88421113",
                Username = "bob",
                Password = "bob",
                Claims =
                {
                    new Claim(JwtClaimTypes.Name, "Bob Smith"),
                    new Claim(JwtClaimTypes.GivenName, "Bob"),
                    new Claim(JwtClaimTypes.FamilyName, "Smith"),
                    new Claim(JwtClaimTypes.Email, "BobSmith@email.com"),
                    new Claim(JwtClaimTypes.EmailVerified, "true", ClaimValueTypes.Boolean),
                    new Claim(JwtClaimTypes.WebSite, "http://bob.com"),
                    new Claim(JwtClaimTypes.Address, JsonSerializer.Serialize(address),
                        IdentityServerConstants.ClaimValueTypes.Json),
                    new Claim(JwtClaimTypes.Role, "User")
                }
            }
        };
    }
}2
3
4
5
6
7
8
9
10
11
12
13
14
15
16
17
18
19
20
21
22
23
24
25
26
27
28
29
30
31
32
33
34
35
36
37
38
39
40
41
42
43
44
45
46
47
48
49
50
51
52
53
54
接下来需要在IdentityResources中添加角色数据。角色并非标准化的资源,需要我们手动创建。
public static IEnumerable<IdentityResource> IdentityResources =>
    new[]
    {
        new IdentityResources.OpenId(),
        new IdentityResources.Profile(),
        new IdentityResource("roles", "角色", new[] {JwtClaimTypes.Role})
};2
3
4
5
6
7
要在API中使用自定义Claims,需要在ApiScopes中进行如下配置。
public static IEnumerable<ApiScope> ApiScopes =>
    new[]
    {
        new ApiScope("WeatherApi", "天气预报", new[] {JwtClaimTypes.Role})
};2
3
4
5
最后我们需要在注册客户端时开放角色的Scope。
public static IEnumerable<Client> Clients =>
    new[]
    {
        new Client
        {
            ClientId = "ImplicitJavaScriptClient",
            RequireClientSecret = false,
            AllowedGrantTypes = GrantTypes.Implicit,
            AllowedScopes =
            {
                "WeatherApi",
                IdentityServerConstants.StandardScopes.OpenId,
                IdentityServerConstants.StandardScopes.Profile,
                "roles"
            },
            AllowAccessTokensViaBrowser = true,
            ClientUri = "https://localhost:8000",
            RedirectUris =
            {
                "https://localhost:8000/signin-oidc.html",
                "https://localhost:8000/silent.html"
            },
            PostLogoutRedirectUris = {"https://localhost:8000/signout-oidc.html"},
            AllowedCorsOrigins = {"https://localhost:8000"},
            RequireConsent = true,
            AccessTokenLifetime = 5 * 60,
            AlwaysIncludeUserClaimsInIdToken = true
        }
};2
3
4
5
6
7
8
9
10
11
12
13
14
15
16
17
18
19
20
21
22
23
24
25
26
27
28
29
1.2 API
我们添加以下两个API来演示角色授权。
[ApiController]
[Route("[controller]")]
public class AuthorizationController : ControllerBase
{
    [Authorize(Roles = "User")]
    [HttpGet]
    public string Get() => "you successfully called API with role User";

    [Authorize(Roles = "Administrator")]
    [HttpPost]
    public string Post() => "you successfully called API with role Administrator";
}2
3
4
5
6
7
8
9
10
11
12
AuthorizeAttribute可以过滤Asp.Net的角色,通过以下代码将自定义角色Claims映射为Asp.Net的角色。
public void ConfigureServices(IServiceCollection services)
{
    // ...
    services
        .AddAuthentication(JwtBearerDefaults.AuthenticationScheme)
        .AddJwtBearer(JwtBearerDefaults.AuthenticationScheme, options =>
        {
            options.Authority = identityServerOptions.Address;
            options.TokenValidationParameters = new TokenValidationParameters
            {
                ValidateAudience = false,
                RequireExpirationTime = true,
                ClockSkew = TimeSpan.FromSeconds(25),

                NameClaimType = JwtClaimTypes.Name,
                RoleClaimType = JwtClaimTypes.Role
            };
        });
}2
3
4
5
6
7
8
9
10
11
12
13
14
15
16
17
18
19
本节代码已分享到Github。
1.3 Client
1.3.1 UserManager
在UserManager中添加角色Scope。
let mgr = new Oidc.UserManager({
    authority: "https://localhost:5000",
    client_id: "ImplicitJavaScriptClient",
    redirect_uri: window.location.origin + "/signin-oidc.html",
    post_logout_redirect_uri: window.location.origin + "/signout-oidc.html",
    silent_redirect_uri: window.location.origin + "/silent-oidc.html",
    automaticSilentRenew: true,
    response_type: "id_token token",
    scope: "WeatherApi openid profile roles",
    revokeAccessTokenOnSignout: true,
});2
3
4
5
6
7
8
9
10
11
1.3.2 CallAPI
使用以下代码调用测试条用API。
//RBAC
(function () {
    function callUserRoleApi() {
        request("https://localhost:10000/Authorization", "GET", function (response) {
            alert(response)
        });
    }

    function callAdministratorRoleApi() {
        request("https://localhost:10000/Authorization", "POST", function (response) {
            alert(response)
        });
    }

    document.querySelector("#callUserRoleApi").addEventListener("click", callUserRoleApi);
    document.querySelector("#callAdministratorRoleApi").addEventListener("click", callAdministratorRoleApi);
})();2
3
4
5
6
7
8
9
10
11
12
13
14
15
16
17
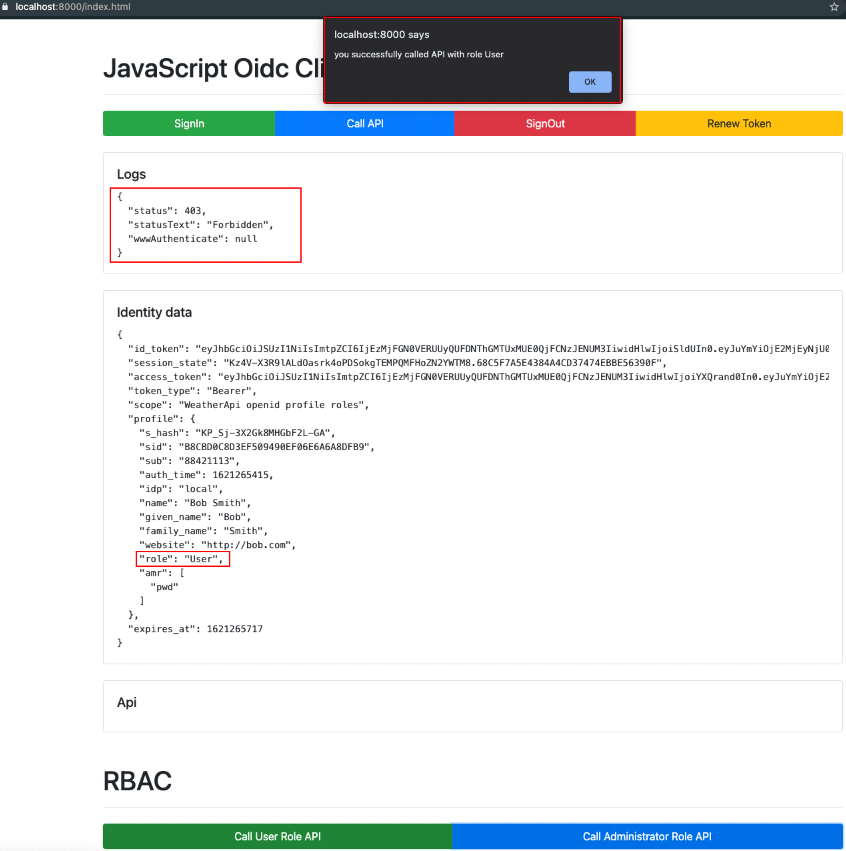
无权访问时得到403 Forbidden响应,效果如下图所示。 
2. PBAC
相较于RBAC简单且单一的角色权限控制,基于策略的授权方式(Policy-based Access Control(PBAC))更为灵活多变。它可以将任意Claims组合使用,允许进行复杂的自定义鉴权规则。
RBAC只使用了Role Claim,而PCAC则可以随意组合任意Claims,两者用法也几近相同,下面我们做简单演示。
2.1 Identity Server
我们在TestUsers.Users中为alice用户设置一个Nationality Claim,用于组合策略。
public static List<TestUser> Users
{
    get
    {
        var address = new
        {
            street_address = "One Hacker Way",
            locality = "Heidelberg",
            postal_code = 69118,
            country = "Germany"
        };

        return new List<TestUser>
        {
            new TestUser
            {
                SubjectId = "818727",
                Username = "alice",
                Password = "alice",
                Claims =
                {
                    new Claim(JwtClaimTypes.Name, "Alice Smith"),
                    new Claim(JwtClaimTypes.GivenName, "Alice"),
                    new Claim(JwtClaimTypes.FamilyName, "Smith"),
                    new Claim(JwtClaimTypes.Email, "AliceSmith@email.com"),
                    new Claim(JwtClaimTypes.EmailVerified, "true", ClaimValueTypes.Boolean),
                    new Claim(JwtClaimTypes.WebSite, "http://alice.com"),
                    new Claim(JwtClaimTypes.Address, JsonSerializer.Serialize(address),
                        IdentityServerConstants.ClaimValueTypes.Json),
                    new Claim(JwtClaimTypes.Role, "Administrator"),
                    new Claim(JwtClaimTypes.Role, "User"),
                    new Claim("nationality","China")
                }
            }
        };
    }
}2
3
4
5
6
7
8
9
10
11
12
13
14
15
16
17
18
19
20
21
22
23
24
25
26
27
28
29
30
31
32
33
34
35
36
37
接下来我们需要将国籍信息分别配置到IdentityResources/ApiScopes/Clients中。
public static IEnumerable<IdentityResource> IdentityResources =>
    new[]
    {
        new IdentityResources.OpenId(),
        new IdentityResources.Profile(),
        new IdentityResource("roles", "角色", new[] {JwtClaimTypes.Role}),
        new IdentityResource("nationalities", "国籍", new[] {"nationality"}),
    };

public static IEnumerable<ApiScope> ApiScopes =>
    new[]
    {
        new ApiScope("WeatherApi", "天气预报", new[] {JwtClaimTypes.Role,"nationality"})
    };

public static IEnumerable<Client> Clients =>
    new[]
    {
        new Client
        {
            ClientId = "ImplicitJavaScriptClient",
            RequireClientSecret = false,
            AllowedGrantTypes = GrantTypes.Implicit,
            AllowedScopes =
            {
                "WeatherApi",
                IdentityServerConstants.StandardScopes.OpenId,
                IdentityServerConstants.StandardScopes.Profile,
                "roles",
                "nationalities"
            },
            AllowAccessTokensViaBrowser = true,
            ClientUri = "https://localhost:8000",
            RedirectUris =
            {
                "https://localhost:8000/signin-oidc.html",
                "https://localhost:8000/silent.html"
            },
            PostLogoutRedirectUris = {"https://localhost:8000/signout-oidc.html"},
            AllowedCorsOrigins = {"https://localhost:8000"},
            RequireConsent = true,
            AccessTokenLifetime = 5 * 60,
            AlwaysIncludeUserClaimsInIdToken = true
        }
};2
3
4
5
6
7
8
9
10
11
12
13
14
15
16
17
18
19
20
21
22
23
24
25
26
27
28
29
30
31
32
33
34
35
36
37
38
39
40
41
42
43
44
45
2.2 API
声明Policy如下,策略要求认证用户是中国籍且是管理员角色。
public void ConfigureServices(IServiceCollection services)
{
    //...
    services.AddAuthorization(options =>
    {
        options.AddPolicy("ChineseAdministrator", policy =>
        {
            policy.RequireAuthenticatedUser();
            policy.RequireClaim("nationality", "China");
            policy.RequireRole("Administrator");
        });
    });
}2
3
4
5
6
7
8
9
10
11
12
13
添加如下API用于测试ChineseAdministrator策略。
[Authorize("ChinaAdministrator")]
[HttpPut]
public string Put() => "you successfully called API with ChinaAdministrator Policy";2
3
2.3 Client
在UserManager中添加角色Scope。
let mgr = new Oidc.UserManager({
    authority: "https://localhost:5000",
    client_id: "ImplicitJavaScriptClient",
    redirect_uri: window.location.origin + "/signin-oidc.html",
    post_logout_redirect_uri: window.location.origin + "/signout-oidc.html",
    silent_redirect_uri: window.location.origin + "/silent-oidc.html",
    automaticSilentRenew: true,
    response_type: "id_token token",
    scope: "WeatherApi openid profile roles nationalities",
    revokeAccessTokenOnSignout: true,
});2
3
4
5
6
7
8
9
10
11
使用以下代码调用测试条用API。
(function () {
    function callPolicyApi() {
        request("https://localhost:10000/Authorization", "PUT", function (response) {
            alert(response)
        });
    }

    document.querySelector("#callPolicyApi").addEventListener("click", callPolicyApi);
})();2
3
4
5
6
7
8
9
使用alice用户登录后可以正常访问Policy API,否则会得到403 Forbidden响应。
3. PBAC 扩展
以上PBAC案例中我们直接在ConfigureServices中是引用了预定义IAuthorizationRequirement组合了自定义Policy,当自定义Policy逻辑较为复杂或独立时,我们也可以将其封装为一个 IAuthorizationRequirement 对象并实现IAuthorizationHandler作为授权处理器。
public class ChineseAdministratorRequirement
    : IAuthorizationRequirement,
        IAuthorizationHandler
{
    public Task HandleAsync(AuthorizationHandlerContext context)
    {
        if (context.User.Identity is {IsAuthenticated: true} &&
            context.User.Claims.FirstOrDefault(c => c.Type == "nationality")?.Value == "China" &&
            context.User.IsInRole("Administrator"))
        {
            context.Succeed(this);
            return Task.CompletedTask;
        }

        context.Fail();
        return Task.CompletedTask;
    }
}2
3
4
5
6
7
8
9
10
11
12
13
14
15
16
17
18
一般生产环境下Policy是使用动态数据源(DB等)加载,加载一般在IHostApplicationLifetime.ApplicationStarted声明周期事件中进行。